April 20, 2026
From Amateur to Professional: How to Transform Your Product Photos Into Commercial-Grade Images
You took a photo of your product on your office desk. Or your kitchen table. Or the floor of your living room because the light was decent there at 2pm. The product looks fine in person, but in the photo it looks... not great. There's a shadow you didn't notice. The background is cluttered. The colors are off.
This is the reality for most small business owners doing their own product photography. You don't have a studio or a photographer on retainer. You have a phone, a window, and fifteen minutes between packing orders.
The good news: that imperfect photo might be more usable than you think. Between better shooting habits and AI-powered editing, you can bridge the gap between "I took this on my lunch break" and "this belongs on a brand's homepage." Modern product photo editing doesn't require Photoshop skills or hours of manual work — AI handles the background removal, scene composition, and lighting adjustments for you.
Why Amateur Product Photos Hurt Sales
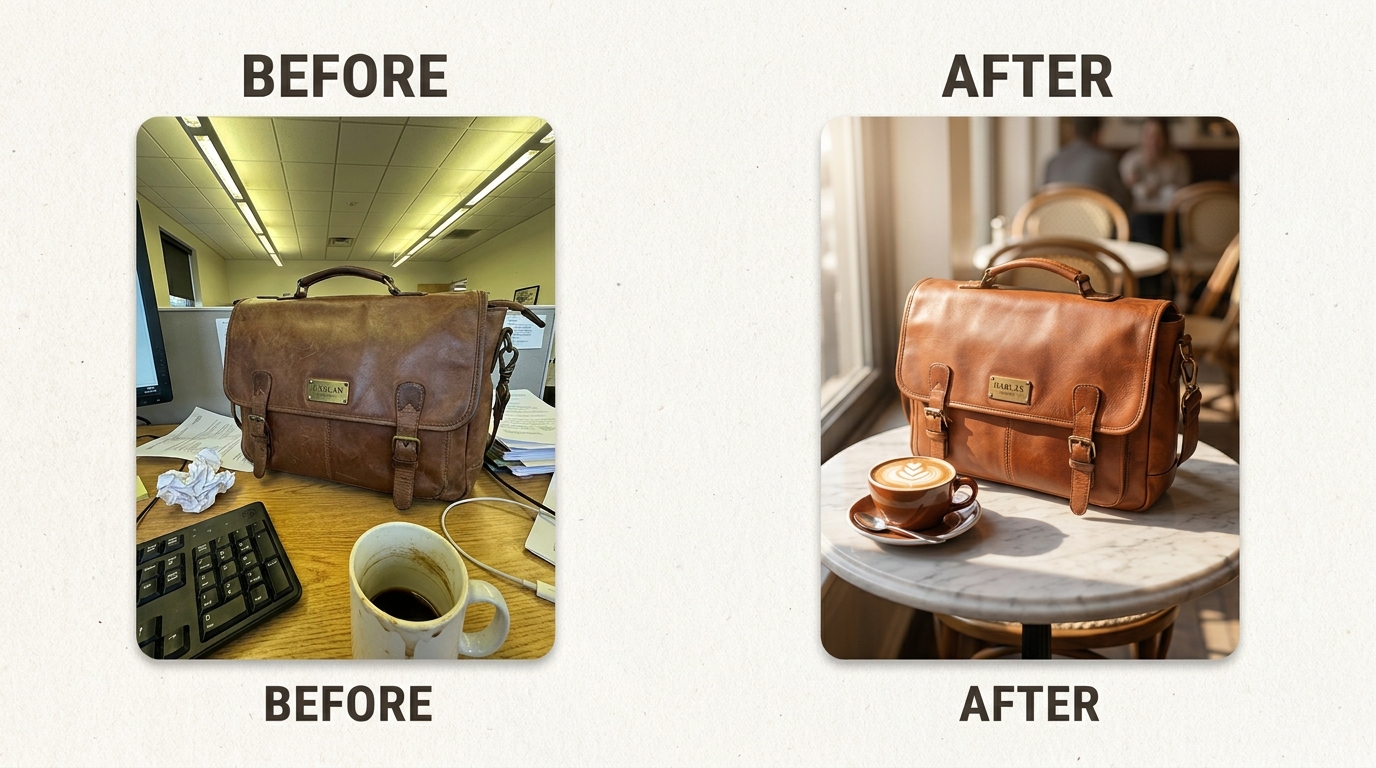
Shoppers make snap judgments. If your product photo looks like a casual snapshot, buyers assume the product itself is low quality — even when it isn't. A leather briefcase photographed under fluorescent lights next to a dirty coffee mug and crumpled papers reads as "cheap" regardless of the craftsmanship.
The problem isn't usually the product. It's the environment. Cluttered backgrounds, uneven lighting, color casts from overhead bulbs, random objects creeping into frame — these are the things that make a photo feel amateur.
The before-and-after above tells the story. Same briefcase, same leather, same stitching. But in one version it's lost in office clutter, and in the other it's sitting on a marble café table with warm natural light and a latte in the background. The product didn't change. The context did.
Start With a Better Source Photo
AI can do a lot, but it works best when you give it something reasonable to start with. You don't need a studio — you need a few habits.
Get the lighting right. Natural light from a window is your best free resource. Shoot during the day, position your product near a large window, and avoid direct sunlight (it creates harsh shadows). Overcast days are ideal. If you're shooting at night, a daylight LED bulb pointed at a white wall will bounce soft, even light onto your product.
Shoot against a simple background. A white poster board, a clean table, even a plain wall. The background doesn't need to be perfect — especially if you plan to remove it later — but reducing visual noise gives AI tools more to work with.
Fill the frame and keep it sharp. Get close enough that your product takes up most of the image. Tap your phone screen on the product to lock focus. Brace your elbows or use a cheap tripod. A blurry source photo is the one thing AI genuinely can't fix — if the detail isn't captured, no tool can invent it.
Take more shots than you think you need. Shoot from multiple angles. Vary the distance slightly. Take ten photos and pick the sharpest two. Storage is free; reshooting later is not.
What AI Can (and Can't) Fix
Let's be honest about the boundaries.
AI handles well:
- Background removal and replacement. This is where AI shines. Tools like Flyshot's background removal can cleanly separate your product from whatever messy surface it's on, and AI scene generation can place it into a styled environment — a marble countertop, a sunlit shelf, a lifestyle setting that matches your brand.
- Lighting correction. AI can simulate professional lighting, softening harsh shadows and evening out exposure. That fluorescent-lit office photo can look like it was shot with studio strobes.
- Scene styling and context. Instead of renting a studio and buying props, you describe the scene you want — or use editorial art direction to guide the AI — and it generates a commercial-quality environment around your product.
For the best results, keep these in mind:
- Shoot in focus. A sharp source photo gives AI the detail it needs to produce crisp output. Tap to focus on your product and brace your phone or use a tripod.
- Show the full product. Make sure nothing is blocking or cutting off your product in the frame — the more the AI can see, the better the result.
- Use neutral lighting. Natural daylight or a white LED gives the most accurate colors. Avoid strong orange or green casts from indoor bulbs.
Detail preservation means the AI keeps your product's actual textures, stitching, labels, and hardware intact. It won't alter the product itself — which is exactly what you want for honest representation on your listings.
The Transformation Process
Here's what the workflow looks like, using the briefcase from the cover image.
Step 1: Capture. You photograph the briefcase on your desk. Overhead fluorescent lighting, keyboard in the background, papers, a coffee mug. Not ideal, but the product is in focus and well-framed.
Step 2: Background removal. Upload the photo and the AI isolates the briefcase from the desk clutter. The leather texture, buckle hardware, and stitching are all preserved with clean edges.
Step 3: Scene generation. Choose a lifestyle setting or describe what you want — a marble café table, warm natural light, a latte in the background, a sophisticated atmosphere. The AI generates the scene around your product, matching lighting direction and color temperature so the briefcase looks like it naturally belongs there.
Step 4: Review and adjust. If the scene isn't quite right, refine the direction and regenerate. The product stays the same; only the environment changes.
The result looks like you hired a photographer and rented a café. In reality, you took a phone photo at your desk and spent a few minutes with an AI tool.
The Gap Is Smaller Than You Think
If you've been putting off improving your product photos because the distance between where you are and where you want to be feels too wide — start with one product. Take a clean, well-lit photo with your phone. Run it through an AI tool and compare the before and after.
The difference between amateur and professional product photography is rarely about the camera. It's about the environment, the lighting, and the context — exactly the things AI replaces well. Your product is already good enough. Your photos just need to catch up.
Try Flyshot free with your own product photo and see the before-and-after for yourself.